Summary:
- Mask R-CNN is a framework that extends Faster R-CNN to incorporate instance segmentation, making it suitable for parking space detection.
- The architecture and functionalities of Mask R-CNN, including the Region Proposal Network (RPN), Feature Pyramid Network (FPN), Region of Interest (ROI) Align, and mask and class predictions, are explained.
- Parking space detection systems are significant for efficient parking management, reducing traffic congestion, emissions, and air pollution, and enhancing the customer experience.
- Acquiring and preparing the parking space dataset involves addressing challenges such as lighting conditions, parking space layouts, and vehicle occlusions and using annotation techniques and tools.
- Setting up the development environment requires installing Python and essential libraries like TensorFlow and Keras, creating a virtual environment, and incorporating Mask R-CNN and its dependencies.
- The process of training the parking space detection model includes configuring Mask R-CNN, preparing the dataset with data augmentation techniques and splitting it into training and validation sets, and leveraging transfer learning with pre-trained models like ResNet or VGG.
In urban environments, finding an available parking space can be a consistently frustrating experience, as is often the case in many cities. The rapid occupation of spots and the inconvenience it causes when friends want to visit due to the limited parking options can be quite bothersome.
A solution to this predicament involves utilizing a camera positioned near a window and implementing deep learning techniques. The objective is to create a system where your computer notifies you promptly when a new parking spot becomes available.
Although this may appear complex initially, building a functional version of this parking space notification system using deep learning is actually a relatively quick and straightforward process. The necessary tools are readily accessible; it is simply a matter of knowing where to find them and how to effectively integrate them.
In this article, we will guide you through the process of developing a Python-based parking space notification system with a focus on high accuracy using deep learning. Let’s begin by breaking down the problem into manageable steps and exploring how each step can be addressed using machine-learning techniques.
Trending Certification in AI, ML & Data Science
Python Programming Crash Course
Certified Machine Learning Expert
Certified Artificial Intelligence Expert
Certified Advanced ML Developer
Certified Artificial Intelligence AI Developer
Certified Data Science Developer
Complex Problem? Break it down!
When faced with a complex machine-learning problem, it is important to deconstruct it into smaller tasks. This approach allows you to leverage various tools from your machine-learning toolbox to tackle each individual task. Let’s have a look at the step-by-step breakdown to tackle the challenge of detecting open parking spaces:

The machine-learning pipeline receives a video stream captured by a standard webcam positioned to overlook the surroundings through a window:
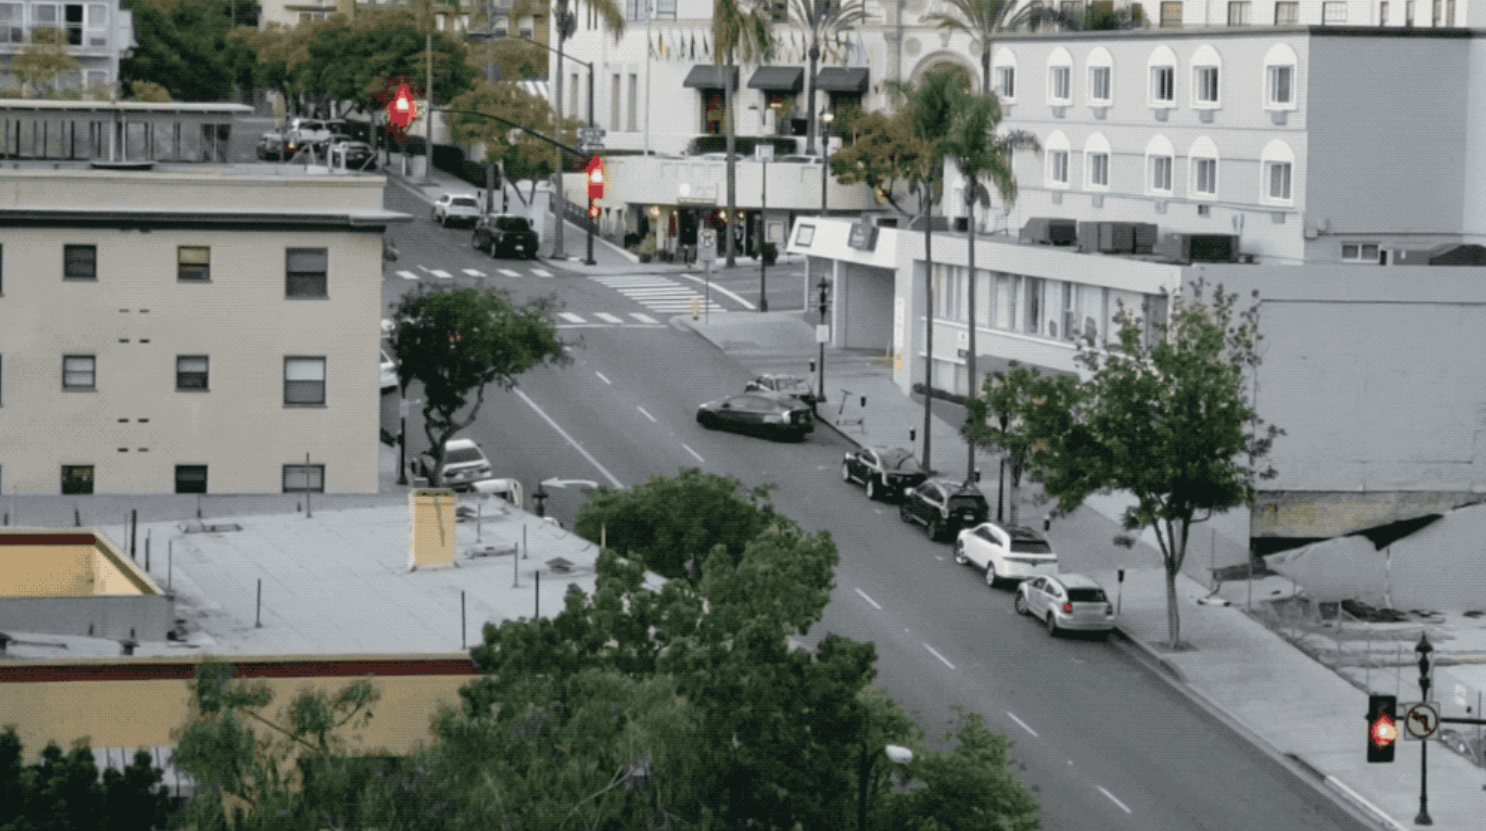
In the video processing pipeline, each frame is passed through a series of steps. Initially, all potential parking spaces in a frame are identified. It is crucial to determine the parking areas before detecting whether they are vacant or occupied.
Next, the focus shifts to detecting cars within each frame. This enables the tracking of car movements from one frame to another.
To distinguish between occupied and unoccupied parking spaces, the results from the previous steps are combined. By combining the information about parking spaces and detected cars, it becomes possible to determine which spaces are currently in use.
Lastly, a notification is triggered whenever a parking space becomes available. This notification system relies on monitoring changes in car positions between consecutive frames.
The implementation of these pipeline steps can vary, utilizing diverse technologies and approaches. There is no definitive right or wrong method to construct this pipeline, as different approaches offer distinct advantages and disadvantages.
Now, let’s delve into each step in detail.
Detecting Parking Spaces in an Image
Imagine you’re looking at a camera view that captures a city street. Here’s what your camera view might look like:
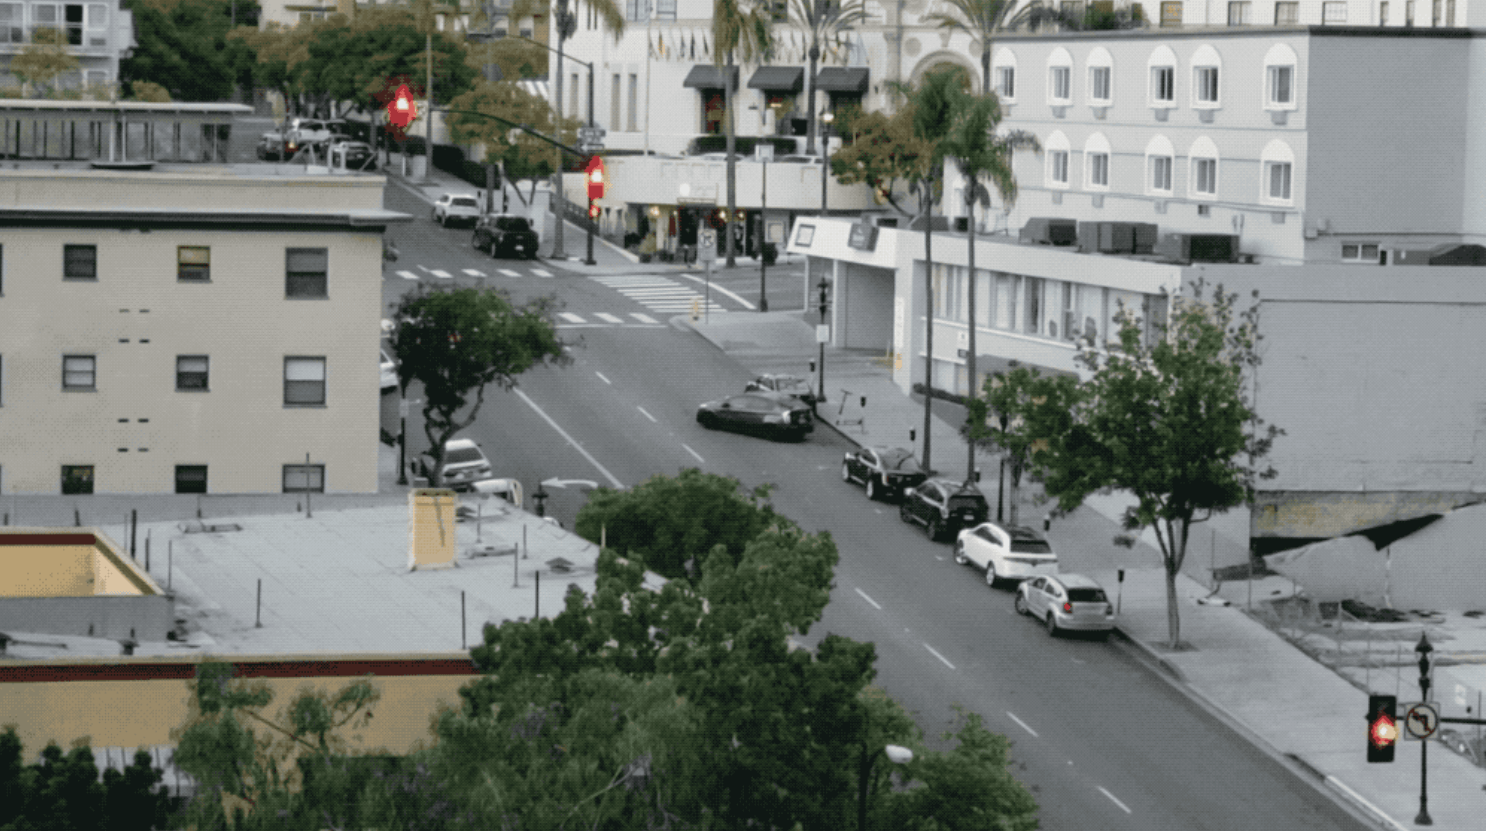
Your goal is to automatically identify the valid parking spaces within that image. Taking the lazy approach would involve manually coding the locations of each parking space, but that would be cumbersome and impractical. If the camera is ever moved or you want to detect parking spaces on a different street, you’d have to repeat the process of hardcoding the locations all over again. That’s definitely not an ideal solution. Let’s explore a more automatic way of detecting parking spaces.
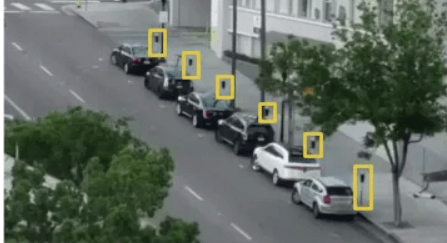
One approach is to search for parking meters and assume that each meter indicates the presence of a parking space beside it. However, this approach comes with its own set of complications. Not every parking spot has a parking meter; in fact, you’re most interested in finding spots that don’t require payment. Additionally, knowing the location of a parking meter doesn’t provide the precise boundaries of the parking space; it only gets you a little closer. Here’s an example of detecting parking meters in the image above:
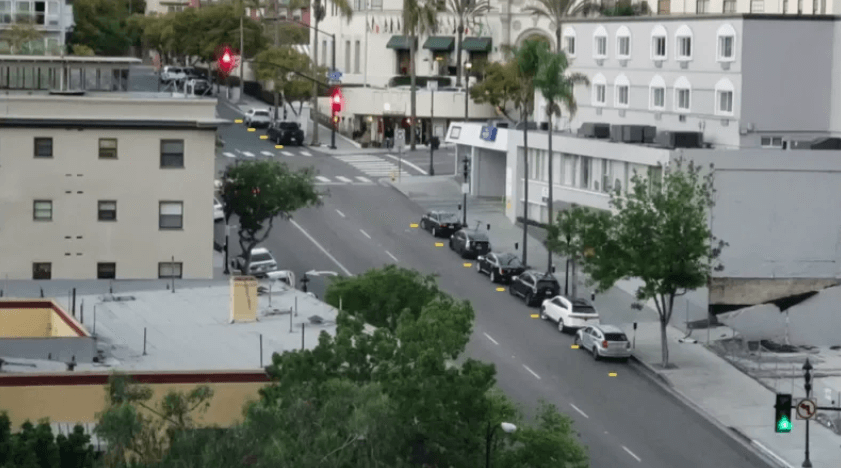
Another idea is to develop an object detection model that can identify the parking space hash marks drawn on the road. These marks represent the boundaries of each parking space. However, this approach also presents challenges. In some cases, the parking space line markers are small and difficult to see from a distance, making it equally challenging for a computer to detect them. Moreover, the street is filled with various unrelated lines and markings, making it difficult to distinguish parking spaces from lane dividers or crosswalks. Here’s an example of parking space hash marks:
However, this approach can be painful too. When faced with a complex problem, it’s worth considering alternative approaches that can circumvent some of the technical difficulties. Let’s redefine our understanding of a parking space. Essentially, a parking space is an area where a car remains stationary for an extended period. Instead of directly detecting parking spaces, why not detect cars that remain motionless for a considerable time and assume that they occupy parking spaces?
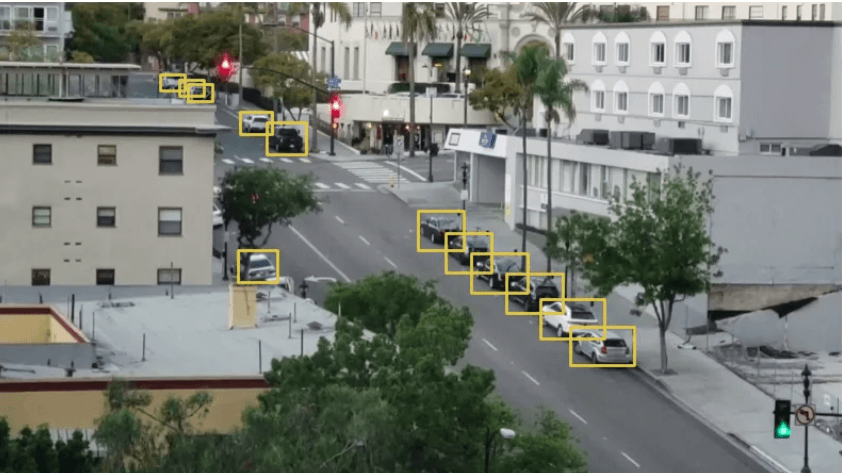
In other words, if you can identify stationary cars within the image and determine which ones don’t move between video frames, you can infer the locations of parking spaces. It’s a simple concept – the bounding box around each car effectively becomes a parking space! Therefore, there’s no need to specifically detect parking spaces when you can identify stationary cars.
Here’s an example of how identifying stationary cars can help in detecting parking spaces:
How to detect cars in an image?
Detecting cars in an image poses a classic challenge in object detection. Various machine-learning approaches can be employed to address this task. Let’s explore some of the commonly used object detection algorithms, ranging from more traditional methods to newer ones:
- One approach is to train a Histogram of Oriented Gradients (HOG) object detector and slide it over the image to locate cars. This method, though relatively fast, may struggle when it comes to detecting cars in different orientations.
- Another option is to train a Convolutional Neural Network (CNN) object detector and slide it across the image until all cars are identified. While this approach offers accuracy, it can be less efficient as it requires scanning the image multiple times with the CNN. Moreover, it demands a larger amount of training data compared to a HOG-based detector. However, it excels at detecting cars in various orientations.
- Alternatively, you can leverage newer deep learning techniques such as Mask R-CNN, Faster R-CNN, or YOLO. These approaches combine the accuracy of CNNs with clever design and efficiency enhancements that significantly expedite the detection process. By utilizing a substantial amount of training data, these models can achieve relatively fast performance, especially when executed on a GPU.
In general, our objective is to select the simplest solution that accomplishes the task with minimal training data rather than assuming that the newest and most advanced algorithm is always necessary. However, in this particular case, opting for Mask R-CNN is a reasonable choice, despite its novelty and flashy nature.
The architecture of Mask R-CNN is specifically designed to efficiently detect objects across the entire image without relying on a sliding window approach. In other words, it operates swiftly. With a modern GPU, you should be able to detect objects in high-resolution videos at a rate of several frames per second, which is adequate for this project.
Furthermore, Mask R-CNN provides detailed information about each detected object. While many object detection algorithms only offer the bounding box coordinates of the objects, Mask R-CNN goes a step further. It not only provides the object’s location but also generates an outline or mask for each object, as demonstrated in the following image:
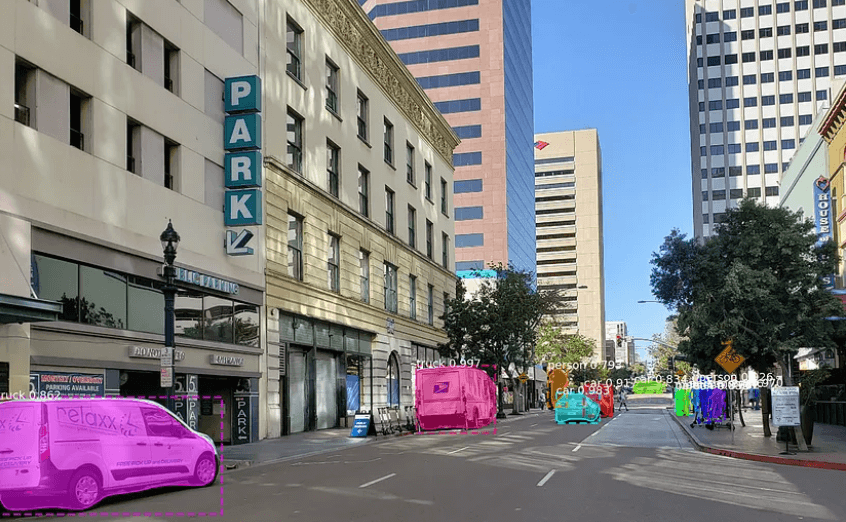
By leveraging Mask R-CNN, you can obtain richer object information, enabling more advanced analysis and applications.
To effectively train Mask R-CNN, an ample amount of images depicting the specific objects you aim to detect is essential. However, manually capturing and delineating cars in these images would be a time-consuming endeavor, requiring several days of dedicated effort. Fortunately, cars are commonly targeted objects for detection, prompting the creation of various publicly available datasets featuring car images.
One such widely recognized dataset is known as COCO, an acronym for Common Objects In Context. COCO comprises a vast collection of images that have been meticulously annotated with object masks. Within this dataset, there exists an impressive assemblage of over 12,000 images where cars have already been outlined. Let’s take a look at an example image from the COCO dataset:
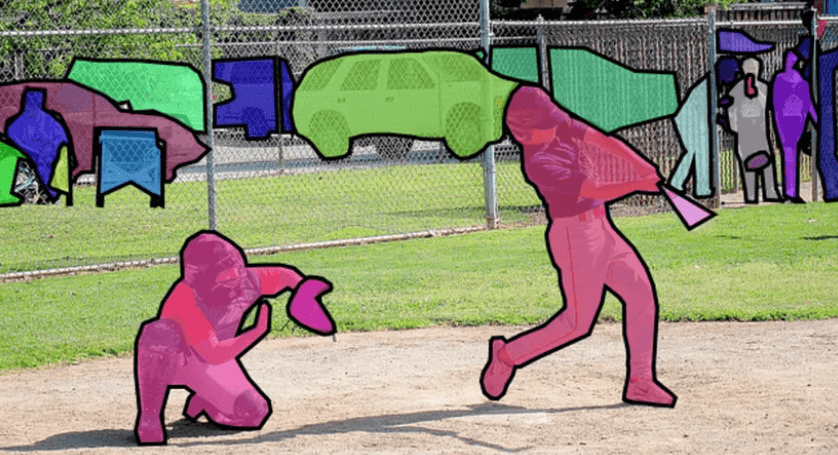
By leveraging these existing datasets, the training process for Mask R-CNN can be significantly streamlined, saving valuable time and effort. The availability of pre-annotated images facilitates the development of robust models capable of accurately detecting cars and other objects of interest. The provided data is ideal for training a Mask R-CNN model. However, there’s more good news! Many individuals have already built object detection models using the COCO dataset and shared their findings. This means that instead of training our own model from scratch, you can leverage a pre-trained model specifically designed for detecting cars. To accomplish this, you will utilize the impressive open source Mask R-CNN implementation developed by WakhraDJ, which conveniently includes a pre-trained model.
It’s worth mentioning that you need not feel intimidated by the prospect of training a custom Mask R-CNN object detector. While annotating the data can be time-consuming, it’s not overly challenging. If you’re interested in learning how to train your own Mask R-CNN model using your unique data, I highly recommend referring to my book for a detailed walkthrough.
When you apply the pre-trained model to our camera image, it automatically identifies the following objects:
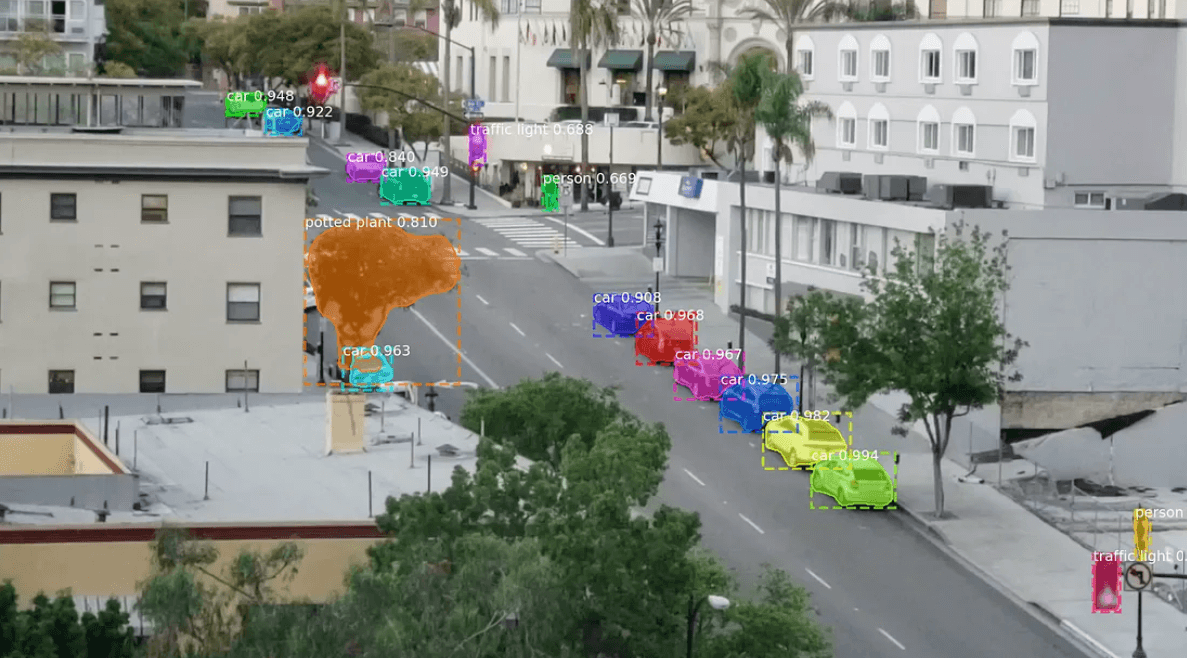
In the process of identifying objects in an image, various elements are obtained from the Mask R-CNN model. These include the object’s type, represented as an integer, and a confidence score indicating the level of certainty in the detection. Additionally, the model provides the bounding box coordinates of the object in terms of X/Y pixel locations. Furthermore, a “mask” in the form of a bitmap is generated, which delineates the pixels within the bounding box that belong to the object.
Object Detection: The Mask R-CNN model not only identifies cars but also other elements like traffic lights, people, and even amusingly, it can label objects such as trees as “potted plants.”
Model Outputs: When an image is processed using the Mask R-CNN model, four essential pieces of information are obtained for each detected object:
- Object Type: Represented as an integer, the model recognizes 80 different common objects, including cars and trucks. You can refer to the provided link for a complete list.
- Confidence Score: The model assigns a confidence score to each detection, indicating the level of certainty in identifying the object. A higher score signifies a more accurate detection.
- Bounding Box: The model provides the X/Y pixel coordinates of the object’s bounding box in the image, which precisely delineates its location.
- Mask: A bitmap “mask” is generated, specifying which pixels within the bounding box belong to the object and which do not. The mask data can be utilized to determine the object’s outline.
To detect the bounding boxes of cars using this pre-trained model, one can utilize the following Python code in conjunction with OpenCV:
Refer to this GitHub for the Cloning or Downloading of the Repository.
import os
import numpy as np
import cv2
import mrcnn.config
import mrcnn.utils
from mrcnn.model import MaskRCNN
from pathlib import Path


# Configuration that will be used by the Mask-RCNN library
class MaskRCNNConfig(mrcnn.config.Config):
    NAME = "coco_pretrained_model_config"
    IMAGES_PER_GPU = 1
    GPU_COUNT = 1
    NUM_CLASSES = 1 + 80  # COCO dataset has 80 classes + one background class
    DETECTION_MIN_CONFIDENCE = 0.6


# Filter a list of Mask R-CNN detection results to get only the detected cars / trucks
def get_car_boxes(boxes, class_ids):
    car_boxes = []

    for i, box in enumerate(boxes):
        # If the detected object isn't a car / truck, skip it
        if class_ids[i] in [3, 8, 6]:
            car_boxes.append(box)

    return np.array(car_boxes)


# Root directory of the project
ROOT_DIR = Path(".")

# Directory to save logs and trained model
MODEL_DIR = os.path.join(ROOT_DIR, "logs")

# Local path to trained weights file
COCO_MODEL_PATH = os.path.join(ROOT_DIR, "mask_rcnn_coco.h5")

# Download COCO trained weights from Releases if needed
if not os.path.exists(COCO_MODEL_PATH):
    mrcnn.utils.download_trained_weights(COCO_MODEL_PATH)

# Directory of images to run detection on
IMAGE_DIR = os.path.join(ROOT_DIR, "images")

# Video file or camera to process - set this to 0 to use your webcam instead of a video file
VIDEO_SOURCE = "test_images/parking.mp4"

# Create a Mask-RCNN model in inference mode
model = MaskRCNN(mode="inference", model_dir=MODEL_DIR, config=MaskRCNNConfig())

# Load pre-trained model
model.load_weights(COCO_MODEL_PATH, by_name=True)

# Location of parking spaces
parked_car_boxes = None

# Load the video file we want to run detection on
video_capture = cv2.VideoCapture(VIDEO_SOURCE)

# Loop over each frame of video
while video_capture.isOpened():
    success, frame = video_capture.read()
    if not success:
        break

    # Convert the image from BGR color (which OpenCV uses) to RGB color
    rgb_image = frame[:, :, ::-1]

    # Run the image through the Mask R-CNN model to get results.
    results = model.detect([rgb_image], verbose=0)

    # Mask R-CNN assumes we are running detection on multiple images.
    # We only passed in one image to detect, so only grab the first result.
    r = results[0]

    # The r variable will now have the results of detection:
    # - r['rois'] are the bounding box of each detected object
    # - r['class_ids'] are the class id (type) of each detected object
    # - r['scores'] are the confidence scores for each detection
    # - r['masks'] are the object masks for each detected object (which gives you the object outline)

    # Filter the results to only grab the car / truck bounding boxes
    car_boxes = get_car_boxes(r['rois'], r['class_ids'])

    print("Cars found in frame of video:")

    # Draw each box on the frame
    for box in car_boxes:
        print("Car: ", box)

        y1, x1, y2, x2 = box

        # Draw the box
        cv2.rectangle(frame, (x1, y1), (x2, y2), (0, 255, 0), 1)

    # Show the frame of video on the screen
    cv2.imshow('Video', frame)

    # Hit 'q' to quit
    if cv2.waitKey(1) & 0xFF == ord('q'):
        break

# Clean up everything when finished
video_capture.release()
cv2.destroyAllWindows()
The script’s output presents a clear visualization of the detected cars, allowing you to easily identify and locate them within the image below:
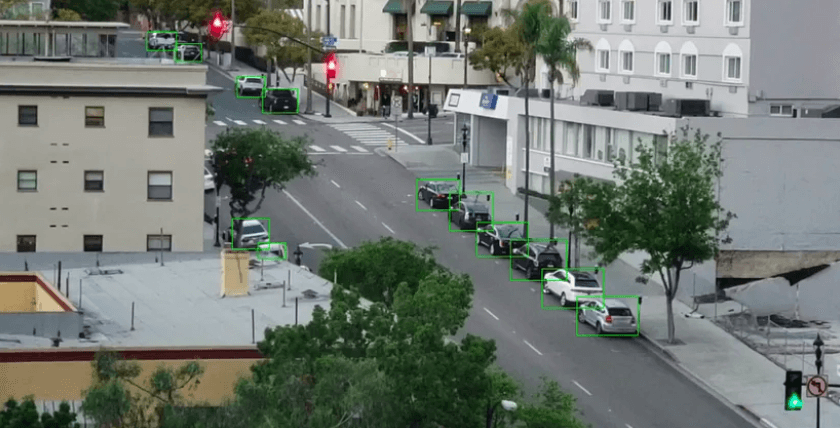
In addition, the console will display the pixel coordinates of each detected car for your reference. Here’s an example of how the coordinates will be printed:
Cars found in the frame of the video:
Car: [492 871 551 961]
Car: [450 819 509 913]
Car: [411 774 470 856]
How to detect empty parking spaces?
One common hurdle encountered is the partial overlap of bounding boxes representing cars in images. Even for cars parked in different spaces, the bounding boxes of each car exhibit a certain degree of overlap, as illustrated below.
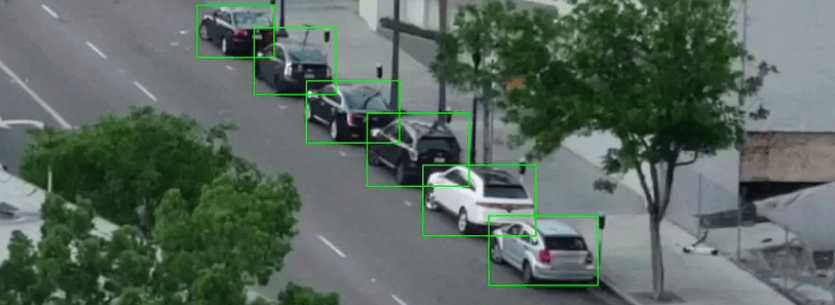
Assuming each bounding box represents a parking space could lead to the misconception that partially occupied boxes are empty spaces. Therefore, a method to measure the overlap between two objects is necessary to identify predominantly empty areas.
To address this, the Intersection Over Union (IoU) metric is utilized. IoU calculates the extent of overlap by determining the number of pixels shared by two objects and dividing it by the total number of pixels covered by both objects. Consider the formula below:
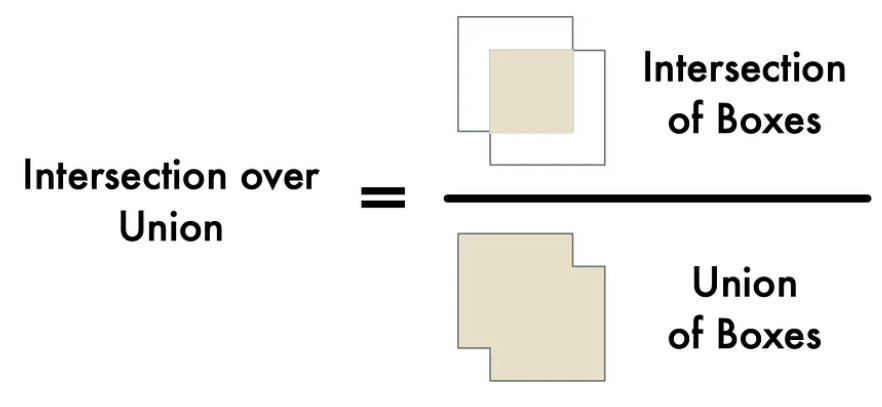
By employing IoU, it becomes possible to precisely assess the overlap between a car’s bounding box and that of a parking spot. This information enables the determination of whether a car occupies a parking space or not. If the IoU measure is low, such as 0.15, it indicates that the car isn’t occupying a significant portion of the parking space. Conversely, if the measure is high, like 0.6, it suggests that the car is occupying the majority of the parking space area, providing confirmation of its occupancy.
Fortunately, IoU is a widely used measurement in the field of computer vision. Many libraries and frameworks already incorporate an implementation of IoU. For instance, the Matterport Mask R-CNN library includes a convenient function called mrcnn.utils.compute_overlaps(), which facilitates the calculation of IoU.
Assuming you possess a list of bounding boxes representing parking areas in an image, determining if detected cars are inside those bounding boxes is a straightforward task. It simply involves adding a line or two of code:
    # Filter the results to only grab the car / truck bounding boxes
    car_boxes = get_car_boxes(r['rois'], r['class_ids'])

    # See how much cars overlap with the known parking spaces
    overlaps = mrcnn.utils.compute_overlaps(car_boxes, parking_areas)

    print(overlaps)
By incorporating this code, you will get a result like this:
[
 [1.         0.07040032 0.         0.]
 [0.07040032 1.         0.07673165 0.]
 [0.         0.         0.02332112 0.]
]
In the two-dimensional array, each row corresponds to a parking space bounding box, while each column represents the level of overlap with a detected car. A score of 1.0 indicates complete occupancy, while a lower score, like 0.02, suggests the car merely touches the space without occupying a significant portion.
To identify unoccupied parking spaces, let’s examine each row in the array. If all the values are either zero or very small, it indicates that the space is vacant and available for use.
Addressing Object Detection Challenges
It’s essential to acknowledge that object detection in live video may not always be flawless. Despite the high accuracy of the chosen Mask R-CNN method, occasional misses in detecting cars can occur within a single frame. To avoid erroneously identifying open spaces due to such temporary detection lapses, it is prudent to verify the vacancy over a brief period. By analyzing a consecutive sequence of 5 or 10 video frames, you can ensure the reliability of space availability.
Triggering SMS Alerts
Once you observe sustained vacancy across multiple video frames, the final step in our process involves sending an SMS alert. A convenient option for this task is Twilio—an API that allows sending SMS messages using a few lines of code in various programming languages. However, you are free to choose an alternative SMS provider based on your preferences. The subsequent steps detail the integration of Twilio into your solution:
pip3 install twilioWith the Twilio library successfully installed, you can send an SMS message using the following code snippet (remember to replace the placeholders with your actual account details):
from twilio.rest import Client

# Twilio account details
twilio_account_sid = 'Your Twilio SID here'
twilio_auth_token = 'Your Twilio Auth Token here'
twilio_source_phone_number = 'Your Twilio phone number here'

# Create a Twilio client object instance
client = Client(twilio_account_sid, twilio_auth_token)

# Send an SMS
message = client.messages.create(
    body="This is my SMS message!",
    from_=twilio_source_phone_number,
    to="Destination phone number here"
)
Integrating SMS Functionality
To incorporate SMS capabilities into your script, integrate the provided code snippet. Ensure that you implement measures to prevent excessive messaging, such as maintaining a flag to track whether an SMS has already been sent. Only initiate a new alert after a specific time interval has elapsed or upon detecting the availability of a different parking space.
Bringing it altogether
Now, let’s put each step of the pipeline into a unified Python script. Below is the comprehensive code:
Refer to this GitHub for the Cloning or Downloading of the Repository.
import os
import numpy as np
import cv2
import mrcnn.config
import mrcnn.utils
from mrcnn.model import MaskRCNN
from pathlib import Path
from twilio.rest import Client


# Configuration that will be used by the Mask-RCNN library
class MaskRCNNConfig(mrcnn.config.Config):
    NAME = "coco_pretrained_model_config"
    IMAGES_PER_GPU = 1
    GPU_COUNT = 1
    NUM_CLASSES = 1 + 80  # COCO dataset has 80 classes + one background class
    DETECTION_MIN_CONFIDENCE = 0.6


# Filter a list of Mask R-CNN detection results to get only the detected cars / trucks
def get_car_boxes(boxes, class_ids):
    car_boxes = []

    for i, box in enumerate(boxes):
        # If the detected object isn't a car / truck, skip it
        if class_ids[i] in [3, 8, 6]:
            car_boxes.append(box)

    return np.array(car_boxes)


# Twilio config
twilio_account_sid = 'YOUR_TWILIO_SID'
twilio_auth_token = 'YOUR_TWILIO_AUTH_TOKEN'
twilio_phone_number = 'YOUR_TWILIO_SOURCE_PHONE_NUMBER'
destination_phone_number = 'THE_PHONE_NUMBER_TO_TEXT'
client = Client(twilio_account_sid, twilio_auth_token)


# Root directory of the project
ROOT_DIR = Path(".")

# Directory to save logs and trained model
MODEL_DIR = os.path.join(ROOT_DIR, "logs")

# Local path to trained weights file
COCO_MODEL_PATH = os.path.join(ROOT_DIR, "mask_rcnn_coco.h5")

# Download COCO trained weights from Releases if needed
if not os.path.exists(COCO_MODEL_PATH):
    mrcnn.utils.download_trained_weights(COCO_MODEL_PATH)

# Directory of images to run detection on
IMAGE_DIR = os.path.join(ROOT_DIR, "images")

# Video file or camera to process - set this to 0 to use your webcam instead of a video file
VIDEO_SOURCE = "test_images/parking.mp4"

# Create a Mask-RCNN model in inference mode
model = MaskRCNN(mode="inference", model_dir=MODEL_DIR, config=MaskRCNNConfig())

# Load pre-trained model
model.load_weights(COCO_MODEL_PATH, by_name=True)

# Location of parking spaces
parked_car_boxes = None

# Load the video file we want to run detection on
video_capture = cv2.VideoCapture(VIDEO_SOURCE)

# How many frames of video we've seen in a row with a parking space open
free_space_frames = 0

# Have we sent an SMS alert yet?
sms_sent = False

# Loop over each frame of video
while video_capture.isOpened():
    success, frame = video_capture.read()
    if not success:
        break

    # Convert the image from BGR color (which OpenCV uses) to RGB color
    rgb_image = frame[:, :, ::-1]

    # Run the image through the Mask R-CNN model to get results.
    results = model.detect([rgb_image], verbose=0)

    # Mask R-CNN assumes we are running detection on multiple images.
    # We only passed in one image to detect, so only grab the first result.
    r = results[0]

    # The r variable will now have the results of detection:
    # - r['rois'] are the bounding box of each detected object
    # - r['class_ids'] are the class id (type) of each detected object
    # - r['scores'] are the confidence scores for each detection
    # - r['masks'] are the object masks for each detected object (which gives you the object outline)

    if parked_car_boxes is None:
        # This is the first frame of video - assume all the cars detected are in parking spaces.
        # Save the location of each car as a parking space box and go to the next frame of video.
        parked_car_boxes = get_car_boxes(r['rois'], r['class_ids'])
    else:
        # We already know where the parking spaces are. Check if any are currently unoccupied.

        # Get where cars are currently located in the frame
        car_boxes = get_car_boxes(r['rois'], r['class_ids'])

        # See how much those cars overlap with the known parking spaces
        overlaps = mrcnn.utils.compute_overlaps(parked_car_boxes, car_boxes)

        # Assume no spaces are free until we find one that is free
        free_space = False

        # Loop through each known parking space box
        for parking_area, overlap_areas in zip(parked_car_boxes, overlaps):

            # For this parking space, find the max amount it was covered by any
            # car that was detected in our image (doesn't really matter which car)
            max_IoU_overlap = np.max(overlap_areas)

            # Get the top-left and bottom-right coordinates of the parking area
            y1, x1, y2, x2 = parking_area

            # Check if the parking space is occupied by seeing if any car overlaps
            # it by more than 0.15 using IoU
            if max_IoU_overlap < 0.15:
                # Parking space not occupied! Draw a green box around it
                cv2.rectangle(frame, (x1, y1), (x2, y2), (0, 255, 0), 3)
                # Flag that we have seen at least one open space
                free_space = True
            else:
                # Parking space is still occupied - draw a red box around it
                cv2.rectangle(frame, (x1, y1), (x2, y2), (0, 0, 255), 1)

            # Write the IoU measurement inside the box
            font = cv2.FONT_HERSHEY_DUPLEX
            cv2.putText(frame, f"{max_IoU_overlap:0.2}", (x1 + 6, y2 - 6), font, 0.3, (255, 255, 255))

        # If at least one space was free, start counting frames
        # This is so we don't alert based on one frame of a spot being open.
        # This helps prevent the script triggered on one bad detection.
        if free_space:
            free_space_frames += 1
        else:
            # If no spots are free, reset the count
            free_space_frames = 0

        # If a space has been free for several frames, we are pretty sure it is really free!
        if free_space_frames > 10:
            # Write SPACE AVAILABLE!! at the top of the screen
            font = cv2.FONT_HERSHEY_DUPLEX
            cv2.putText(frame, f"SPACE AVAILABLE!", (10, 150), font, 3.0, (0, 255, 0), 2, cv2.FILLED)

            # If we haven't sent an SMS yet, sent it!
            if not sms_sent:
                print("SENDING SMS!!!")
                message = client.messages.create(
                    body="Parking space open - go go go!",
                    from_=twilio_phone_number,
                    to=destination_phone_number
                )
                sms_sent = True

        # Show the frame of video on the screen
        cv2.imshow('Video', frame)

    # Hit 'q' to quit
    if cv2.waitKey(1) & 0xFF == ord('q'):
        break

# Clean up everything when finished
video_capture.release()
cv2.destroyAllWindows()
To execute the provided code, you will need to install Python 3.6+, Matterport Mask R-CNN, and OpenCV.
The code has intentionally been kept minimalistic. It assumes that the cars present in the first frame of the video are the parked cars. Feel free to experiment with the code and explore ways to enhance its reliability.
Do not hesitate to modify the code to suit different scenarios. By simply adjusting the object IDs that the model searches for, you can transform the code into something entirely different. Consider, for instance, a ski resort where you could adapt the script to automatically identify snowboarders launching off a ramp, creating captivating highlight reels of impressive snowboard jumps. Similarly, if you work in a game reserve, you could use the code to develop a system for counting wild zebras.
Trending Certification in AI, ML & Data Science
Python Programming Crash Course
Certified Machine Learning Expert
Certified Artificial Intelligence Expert
Certified Advanced ML Developer
Certified Artificial Intelligence AI Developer
Certified Data Science Developer
Frequently Asked Questions:
Image & Content Source: Adam Geitgey